I had to force myself to finish writing this entry as it's been sitting in "Draft" state for way too long. Read Step 1 and Step 2 first.
We left Step 2 with a very fat AVI file sitting on our PC and our not-so-fat DVDs sitting in the DVD burner with nothing to do. This entry discusses how to take that raw AVI file and somehow get it into a shape where we could fit it onto a DVD.
So the question was: How do I fit a two hour movie at 25+ GB raw AVI onto a 4.7 GB DVD?
The answer is rather obvious: Compression. We will need to take the raw video file and use compression algorithms to convert it into a MPEG-2 file. Unfortunately we have to compress it A LOT (at least a 6:1 compression ratio) which generally means lossy compression. So this means we're going to have to reduce the quality of our video to fit it onto a DVD.
It may sound odd that we have to reduce the quality of the video (aren't DVDs supposed to support a better quality of video than VHS?) but it's mostly because of my setup (running the VCR through my Camcorder). The computer thinks that it's DV-quality video coming to it through the firewire. It doesn't know that it came from a crummy VHS tape.
But even despite this, uncompressed VCR-quality video proves to be pretty hefty. Here are some of the facts to prove my point:
- a 700 MB CD can hold about 70 minutes of uncompressed audio
- a 4.7 GB DVD has almost 7x the capacity of a CD (hey, that means you could almost fit the entire Led Zeppelin discography onto a DVD uncompressed!)
- a single uncompressed frame of VHS-quality NTSC video (352 x 240) takes about 250 kb
- there are (at least) 24 frames per second, meaning approximately 6 MB per second of video
- 4700 / 6 = 783 seconds = 13 minutes of uncompressed silent video!
I may have gotten some of my facts wrong above, but hopefully you can see my point: some SIGNIFICANT reduction is required.
The good news is that those VHS videos are at a low resolution but by the time they get through the A/V passthrough they have been converted to DV-quality video by the video camera A/V passthrough feature. The capture software doesn't know that the video source came from a VHS tape, it just sees a video stream coming from a digital video camera, so it captures it to a file. This means that the AVI file has a lot of bloat in it that we can trim down without seeing any noticeable degradation in video quality. You should not be able to tell the difference between your VHS and DVD if you don't try to cram more than 2-2.5 hours of VHS video onto the DVD.
TMPGEnc
Go and install TMPGEnc which is a free MPG encoder from Pegasys. It's a zip file so you have to select all the files in the zip file, click Extract and choose the directory you want to install it under. Start up TMPGEnc by double-clicking on the tmpgenc.exe file.
TMPGEnc Project Wizard 1/5
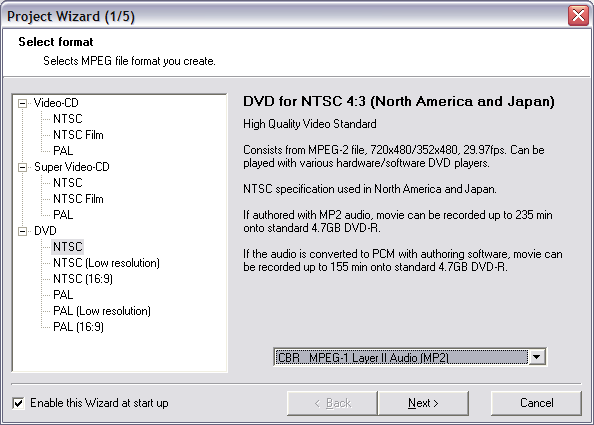
The first thing you see is the Project Wizard by default. This is actually what we want to use, so at Page 1/5 choose DVD > NTSC (High Quality Video Standard). This feature only lasts for 30 days on the free trial version so get your converting done early (or buy the product or figure out a way around their trial expiry 😉 ). You can also set the audio to "CBR MPEG-1 Layer II Audio (MP2)" to save some more space as shown above. Click Next to go to Page 2/5.
TMPGEnc Project Wizard 2/5
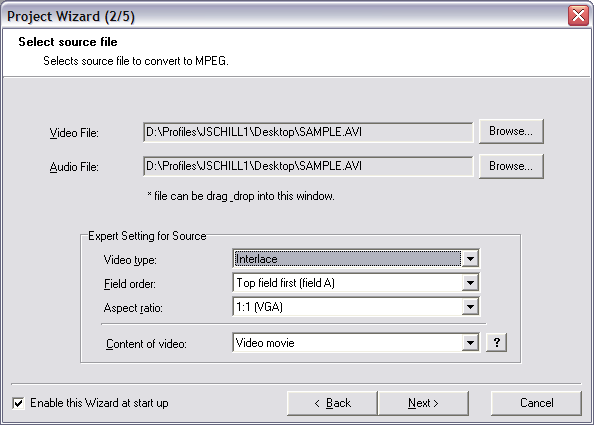
From here you choose your video (and possibly audio file). I found that my cabling set up had produced an audible audio hum, so I had to extract the audio track from the AVI file, use GoldWave to reduce the audio hum, then save it as a WAV file. I may write another blog entry about this amateur "audio engineering" at a later date. For now, I assume you have just one AVI file and that is what you would choose under "Video File". The source of our video is interlaced, so you should make sure you select that under "Video type". Click Next to go to Page 3/5.
TMPGEnc Project Wizard 3/5
Now, here is where we get into some of the cool stuff. If you want to trim out some of the video (i.e. set the start and end frames to something other than the start and end of the AVI file), check the "Source range" checkbox:
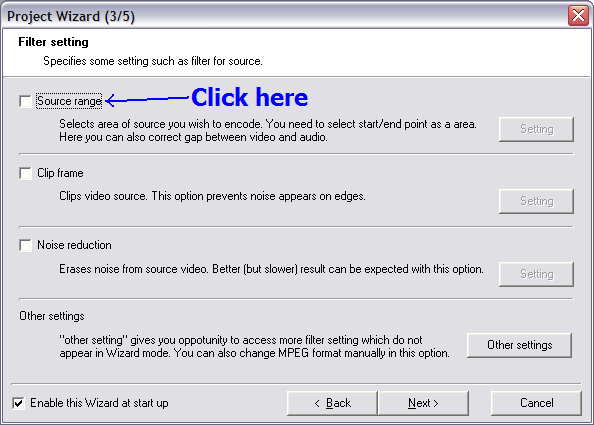
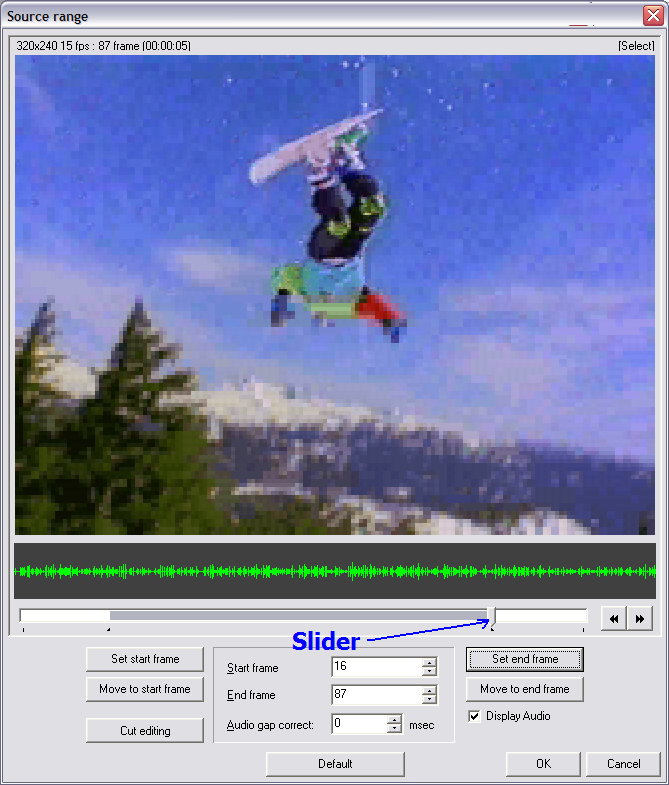
When you do this, the "Source range" window appears with the first frame of your AVI file. You have a slider you can move to any point in the file. Move the slider to the frame you want to use as the start frame and click "Set start frame". Similarly, move the slider to the last frame you want to be included in the MPG file and click "Set end frame". Click OK.
Next, comes an even cooler option. You can trim out parts of the image from any of the 4 borders (top, left, right or bottom edges. For example, if you want to trim out the top 8 lines of video from the image because a boom mike was visible during the shoot, you would check the "Clip frame" option in the Project Wizard 3/5 window. This brings up the "Click frame" window which contains spinner controls for the top, left, right and bottom edges of the video. Play with this until you have the video looking the way you want.
There is a "Noise reduction" checkbox, but I did not use this option.
Clicking the "Other Settings" button produces a "MPEG Settings" window which allows you to significantly tweak the MPEG encoding settings. Chief among these is the "Rate control mode". If you want the best quality encoding, choose "2-Pass VBR" but be warned that this option takes at least twice as long as the "Constant Bitrate" option. If you want to produce "progressive" video, then choose the "Encode mode" as "Non-interlaced". You can manipulate the "Bitrate" here, but I recommend waiting until Screen 4/5 as you can determine how big the file will be from that screen. Click Next to go to Page 4/5.
TMPGEnc Project Wizard 4/5
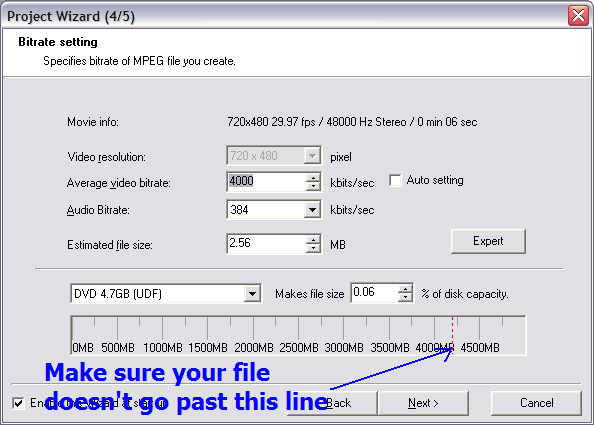
From this screen you will want to modify the "Average video bitrate" and "Audio Bitrate" fields. Play with these values until your file fits within the DVD capacity (indicated by the dotted red line near the bottom of the window). Clicking the "Expert" button brings you to the same "MPEG Settings" window from Screen 3/5 above. Click Next to go to Page 5/5.
TMPGEnc Project Wizard 5/5
Finally, we're almost done. Enter the MPEG filename you want to produce. Click "Start encoding immediately" unless you want to batch up another MPG encoding job (in which case check "Create another project(s) for batch encoding" and start back at Page 1/5. Click OK to start the encoding.
TMPGEnc Encoding Screen
Now you can watch your computer chug away at making a MPEG file, or you can multitask and go browse some porn or you can make some coffee and watch a rerun of Alias or Survivor. Either way, your computer will take its time making the MPEG file, it is a time-consuming process (for example, a 2-hour video may take 10+ hours of CPU time, depending on how fast your PC is). If you want to go to sleep and let the computer finish up, you can check the "Shut down after finish encoding" checkbox while it's encoding away. This will allow TMPGEnc to actually power off your computer when it's finished (a handy feature).
The next entry will explain just what the heck you do with this MPEG file now that you have it created. But...don't hold your breath 😉
today ,i use Amigo DVD Ripper and found that it really useful!
http://www.yaodownload.com/video-design/video/amigodvdripper/